

Showing posts with label buns. Show all posts
Showing posts with label buns. Show all posts
Wednesday, 3 October 2012
Braid Rose
Posted by nuzuka at 09:07Thursday, 9 August 2012
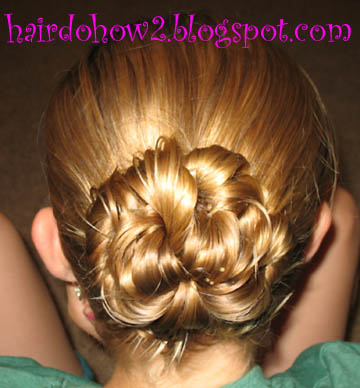
Belle's Baptism Bun
Posted by nuzuka at 09:12
I didn't get step by step pictures since I had bigger things on my mind that day. Start with a half dutch braid for the front section of hair. Put the rest back in a ponytail. Add the braid in. Make several more small braids from the tail of the pony until all the hair is braided. Wrap the braids around the hairband. Tuck the ends under, and use bobby pins to hold it all in. Add a flower or bow to decorate if you want. Ours is from Gimme Clips. I removed it before she got wet and replaced it afterwards.


Monday, 6 August 2012
S-Shaped Bun
Posted by nuzuka at 14:43
Begin with two piggies, one on top of the other. Put the elastic of the top one right at the edge of the part so that the part will not show.


Tuesday, 10 April 2012
Lesson 101: Side Twist into Twisted Side Bun
Posted by nuzuka at 10:01


Now do a hawser twist with the remaining hair that was added in from the twist. Wrap it around, concealing any hairbands or fray from the first twist. Tuck in the ends, and then put in bobby pins.


Monday, 5 March 2012
Lesson 96: Peacock Bun
Posted by nuzuka at 12:50
Belle named this one herself. Begin with a low side ponytail. Add a ribbon to the top. Our ribbon is from Gimme Clips from their Gimme Braids line. It has a loop sewn at the top and comes with a mini bobby pin. If you don't have one, you can tuck the end of a regular ribbon into the hairband, maybe tying it if you think it will come loose.

Braid the hair, being careful to keep the ribbon showing at the outside. Fasten it off with a clear elastic.

Wrap the braid around to form a bun. Leave the tail sticking up to make the "peacock feathers." Insert bobby pins to hold the bun in place. If you push in a pin and it won't go because the ribbon is in the way, pull it back out, and try a new place.

Tuck the ribbon in to hide it or wrap it around the whole bun.

Thursday, 23 February 2012
Lesson 95: Rounded French Braid with Side Braid Bun
Posted by nuzuka at 13:22
Part the hair at the top on the side. French braid the hair down the middle of one side (the side with more hair), but when you get back to the top of the head, begin gathering up triangular sections of hair (use a comb), all with the same point at the end of the part.


Thursday, 17 November 2011
Lesson 80: Sock Bun with Hawser Twist
Posted by nuzuka at 15:10This style is similar to the last post I did for the Barbie hairstyle. These pictures are from about a year ago, and I don't have step by step, so refer to the last post if you need to.

Do a french hawser twist with the bang section you parted out by adding hair only to one side as you cross so that the twist lays over the part. Continue twisting the ends, and add a small elastic. Wrap the twist around the sock bun beneath the loose ends, and pin it in place. Do a french hawser twist around the sock bun with all the loose ends. Tuck the tail under to hide it. Pin it all in place. Tape the twist with a long ribbon. (I wrapped the extra long ends around the whole thing this time.) Add a bow or flower to cover up any messy spots.


Monday, 7 November 2011
Lesson 79: Bun with Ribbon Wrapped Twist
Posted by nuzuka at 15:22This is the Barbie hairstyle I named "Yet Another Musketeer" (number 10) in this Barbie Hairstyle post. It isn't exactly the same, but close enough for me. This special guest is my neighbor friend. She asked me for help to do her hair for a dance competition. She said that it lasted for her second day of dancing, and she just needed to spray some flyaways after she slept on it.
Start with a ponytail. Next you'll need to use a sock to form the bump. Cut the toe off a sock and then roll it until it looks like a doughnut. Put the tail of the ponytail through the hole. Spread the hair over it evenly, and then add another hairband.


Tuck the little tail in under the bun, or if you can use it the next step. Now you will need to do a french hawser twist around the bun. Take up two sections of hair from beside the bun. I did it on the side, but taking it from the top may make it less visible where you start from. Twist each section one direction, then wrap them together in the opposite direction. Add more hair to the sections as you continue twisting around the bun. When you run out of hair to add in, keep twisting the ends together and put a clear hairband in the end. Wrap it around the bun and tuck the ends underneath to hide them. Use bobby pins to hold it all in place.


Wednesday, 19 October 2011
Lesson 78: Worm Bun/ The Brain
Posted by nuzuka at 09:30
Begin with a ponytail. Divide the tail into a few sections. I used four, but if you use more the twists will be thinner and give it a more detailed brain/worm effect. Twist each section all the way to the end, and then keep twisting it tighter and tighter until it starts to curve and make loops. Tuck the end into the hair band.

Wednesday, 5 October 2011
Lesson 77: French Hawser Twist
Posted by nuzuka at 09:28I don't actually know what this is called... It is a hawser twist, but you add hair with each cross like a french braid, but a french twist is a completely different style, so I'll just call it a french hawser twist. Before you try this one, make sure you know how to do a simple hawser rope twist.


Monday, 22 August 2011
Lesson 69: Crazy Eights Bun
Posted by nuzuka at 14:27
Gather the hair into a ponytail.


Subscribe to:
Posts (Atom)